
Over the weekend, I wrote this mega-guide (4,000 words) for startup founders and content marketing teams looking to implement and scale a content marketing strategy. In this guide, we’ll dive into many aspects of technical SEO, a critical component of any content marketing strategy.
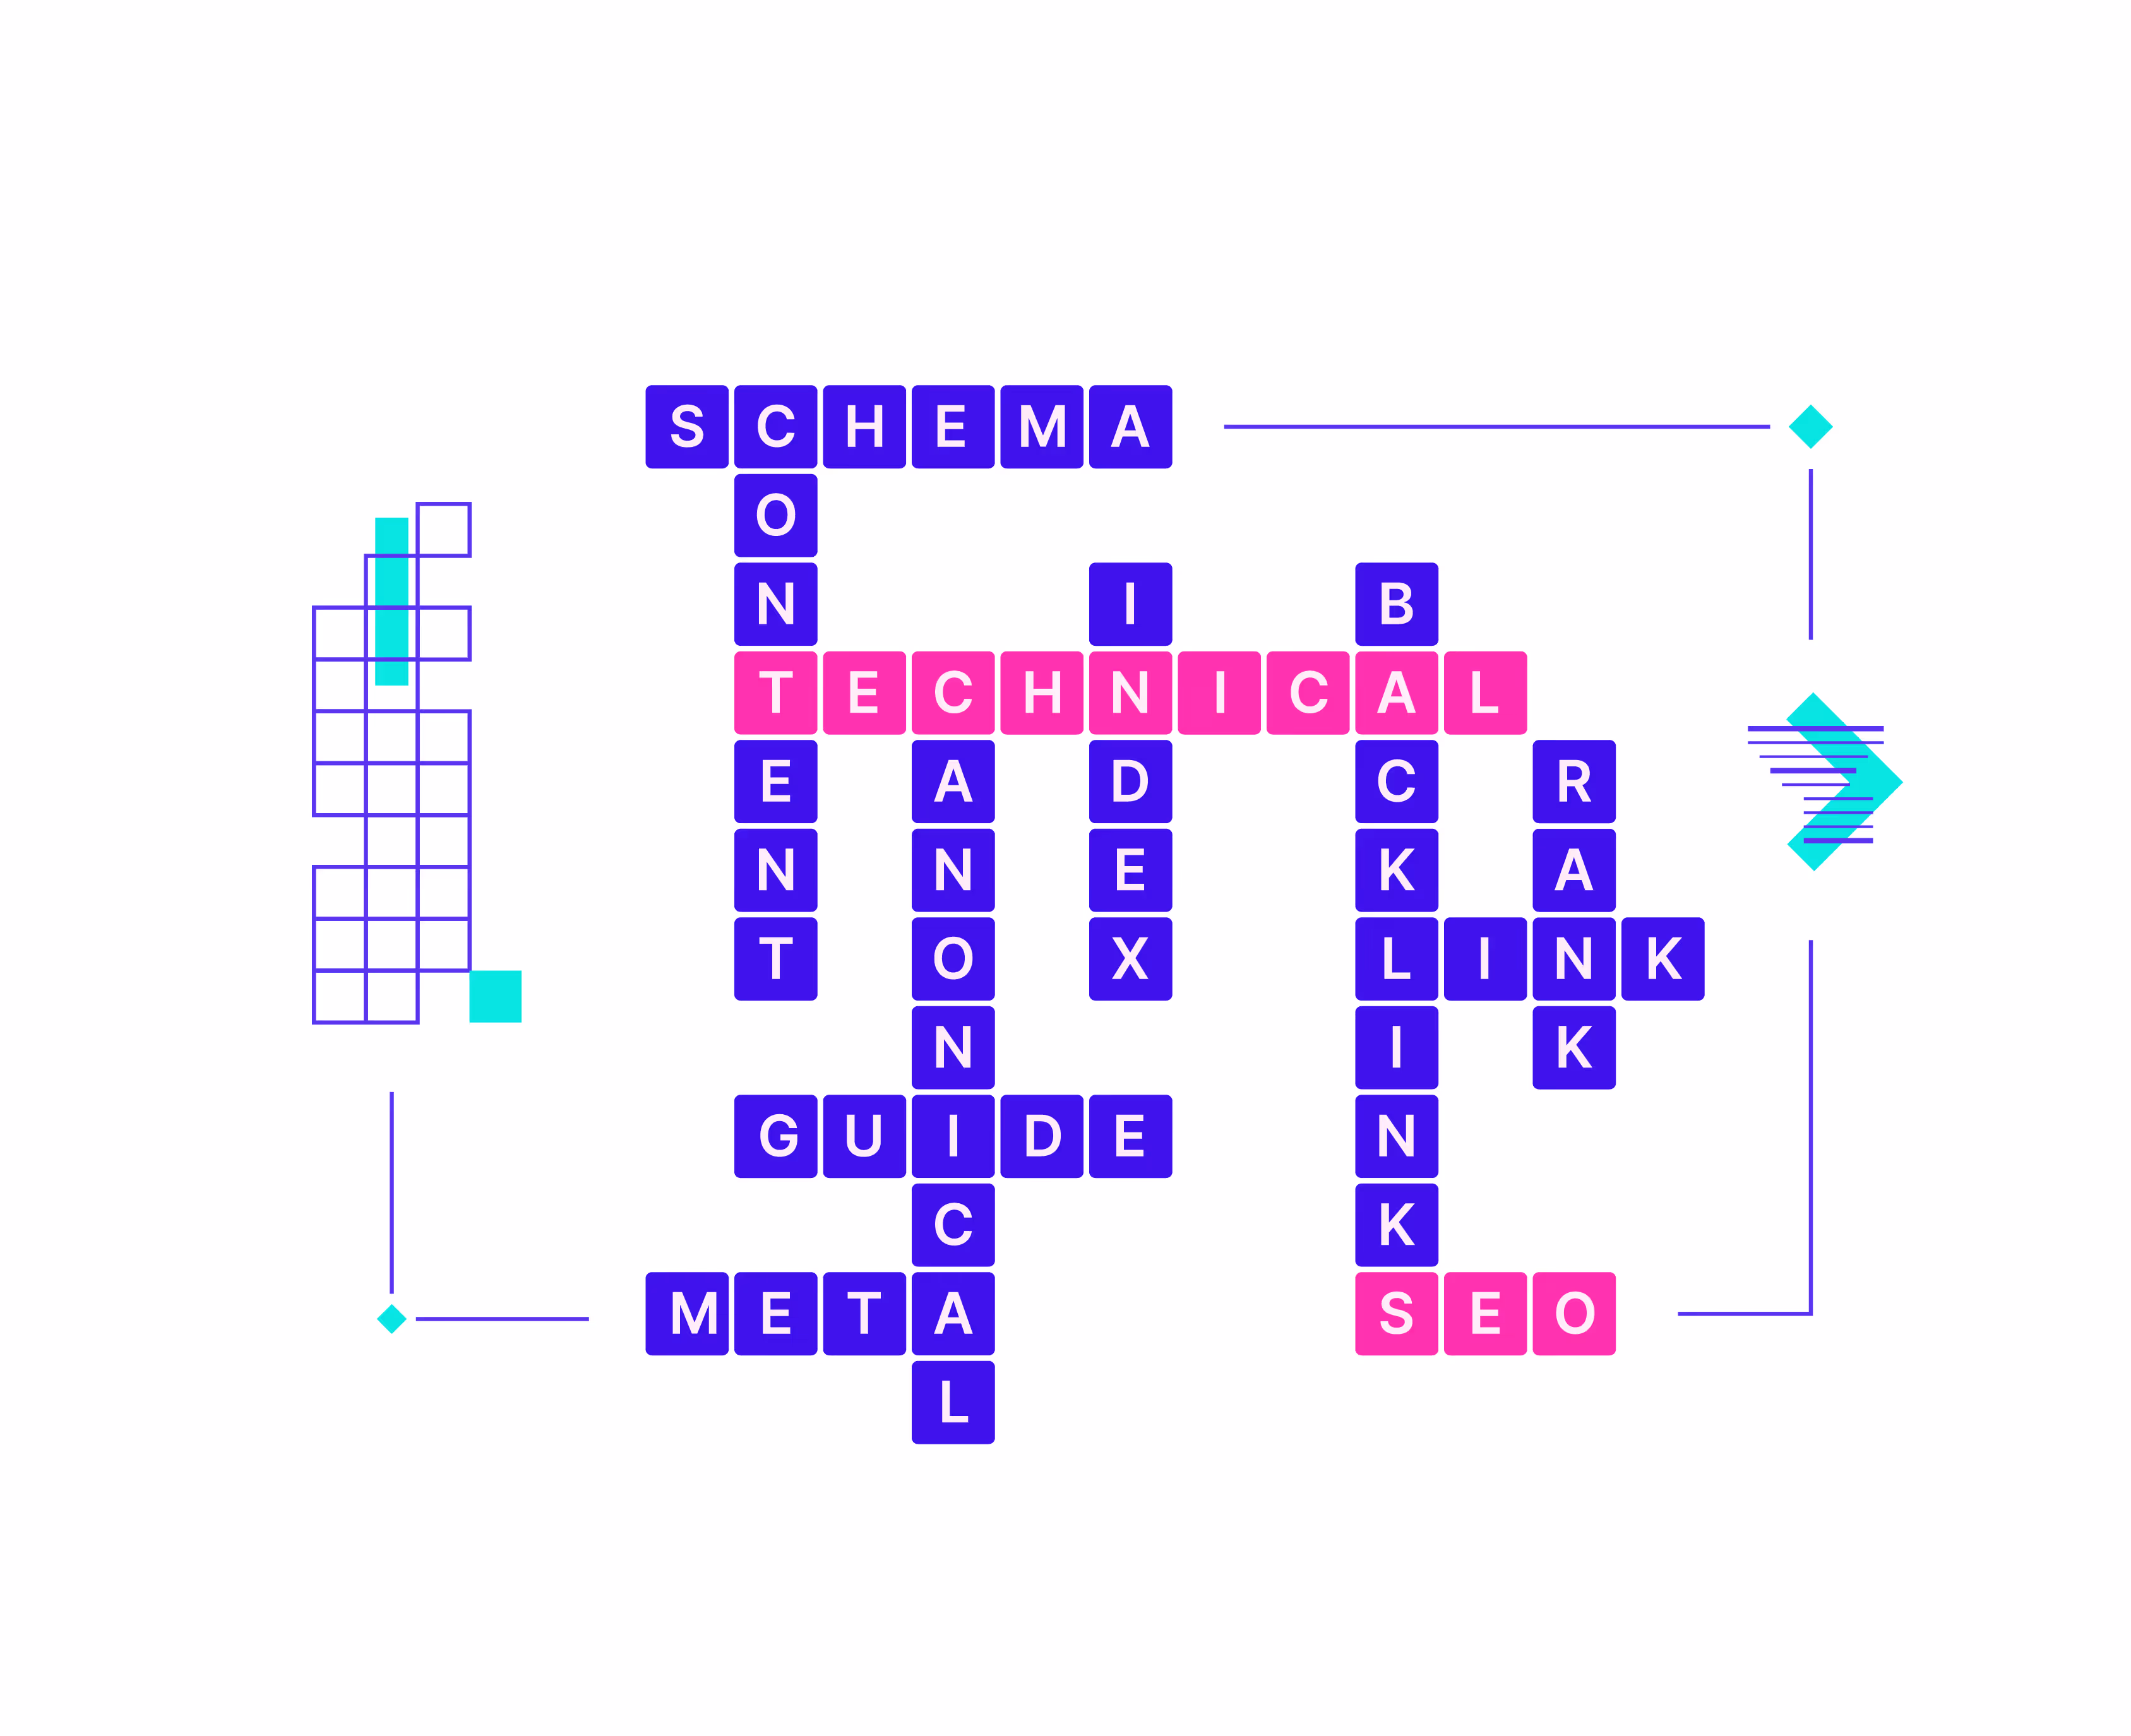
Technical SEO is one of those topics that can be both very simple and very complex. So I’ll go over some of the basics, including internal linking, writing great headers, and using concise URLs, as well as some more complex topics like Core Web Vitals, using structured data, and canonical tags.
If you’d ever like to chat about content marketing or any of the topics I’ve covered in my posts, let me know — I’d be happy to chat.
Let’s dive in!
What Is Technical SEO?
Technical SEO is the process of implementing best practices on your website; these best practices allow search engines (like Google) to understand what your website is about and, in turn, improve the site’s search engine ranking positions.
Technical SEO includes best practices at a page level — for example, using internal links correctly throughout the pages on your website. Technical SEO also includes engineering-related tasks like setting up a sitemap, improving website speed and core vitals, using structured schemas, and structuring your website so Google can digest it quickly and easily.
In this article, we cover 15 best practices to implement and to check for.
1. Set Up Google Search Console
If you haven’t already, now is a great time to set up Google Search Console for your website. Google Search Console is Google’s toolset for content marketing teams, and it includes a number of awesome features for ensuring that your website is giving Google what it needs to index and rank your website.
Search Console provides first-party data like average ranking position, click-through-rate (CTR), and traffic data for your website. And in my experience, Search Console data is often much more accurate than that of Google Analytics and other tracking tools like Ahrefs and Semrush. For example, Ahrefs suggests that our website, ContainIQ, gets only 60k monthly visitors from organic search, but in Search Console we see that the actual number of visitors is closer to 200k!
Search Console also provides a number of tools that alert you to technical issues with your website, including non-indexed pages, slow pages, and more.
Setting up Search Console is very easy. Simply create a new account with your domain and verify the ownership of the domain, and you’re good to go. Even if you aren’t focused on organic search today, activating Search Console early on is a great way to collect data you can refer back to later.
2. Include a Sitemap

After setting up Search Console, the next important step is to make sure that your website is generating a sitemap. A sitemap is the definitive list of pages on your website, and by generating a sitemap, you can very clearly communicate to search engines which pages it should be crawling and indexing on your website.
Today, most CMS platforms, like WordPress and Webflow, will generate a sitemap for you automatically. In most cases, your sitemap will be found at yourdomain.com/sitemap.xml (replace yourdomain.com with your site’s URL).
For ContainIQ, Webflow created a sitemap automatically here: https://www.containiq.com/sitemap.xml.
You’ll see that our sitemap includes a large number of URLs, including the individual blog posts on our website, the author pages, and the category pages. If you have a few minutes, it’s a good idea to spot-check the sitemap for the different types of pages you’re creating on your website and make sure that they’ve been included correctly.
And now that you’ve set up Search Console, it is always a good idea to submit your sitemap to Google directly:
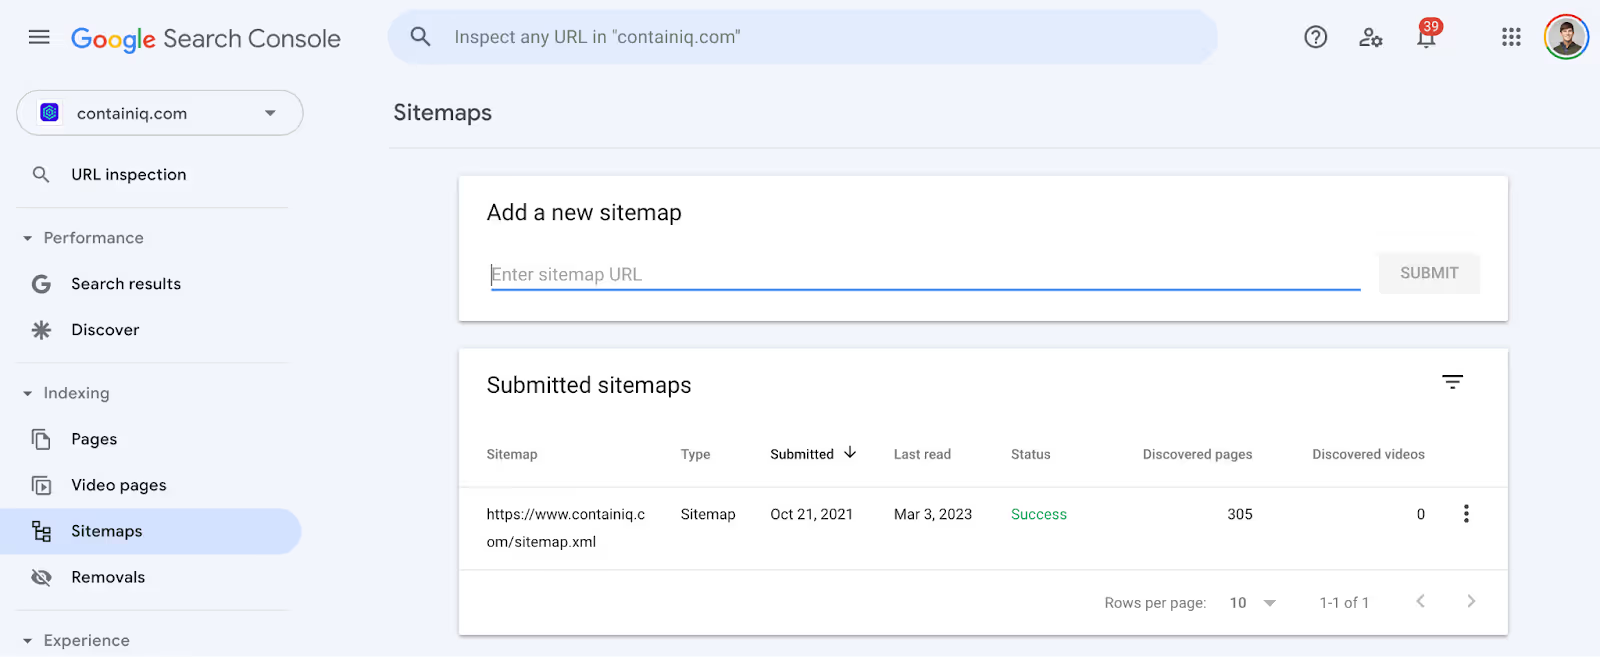
You can very quickly submit your sitemap to Google using Search Console, and Google will tell you how many pages it has discovered from the sitemap. In our case, I know that approximately 300 pages are accurate. And if you have multiple subdomains that generate multiple sitemaps, it’s always a good idea to submit each of your sitemaps individually.
Google will tell you how many pages from your sitemap are indexed, as well as tell you which pages aren’t indexed and why:

In our case, we’re using the noindex tag on a number of pages. But we clearly see that Google is finding and indexing the vast majority of our website as we expect it to.
3. Avoid Using Subdomains
I always recommend including your blog — or any content that you’d like to rank well in search engines — on your primary domain name.
I often see startups launch a blog on a subdomain, for example, blog.yourwebsite.com.
Stop! By publishing your blog on a subdomain, you’re effectively telling search engines that this content is on an entirely separate domain altogether. It’s a much better practice to include your blog on the primary domain as a subdirectory: for instance, yourwebsite.com/blog/.
By including the blog on your primary domain, you’re clearly communicating to search engines that the blog is core to your website. And as I discussed in my blog post about building backlinks, building domain authority is an important factor in getting your website and its pages to rank well in search. And all of the domain authority you build with your primary domain won’t pass as naturally to a subdomain. We’ve tested hosting content on subdomains and on primary domains extensively in the past, and the primary domain content has almost always performed better in practice.
I understand that moving the blog from a subdomain to your primary domain might require engineering resources, but I assure you that it will be time well spent.
4. Internal Linking Is Critical
Internal linking is one of the most important things you can do, but it’s often overlooked and under appreciated. Internal linking is the process of interlinking the pages or posts on your website.
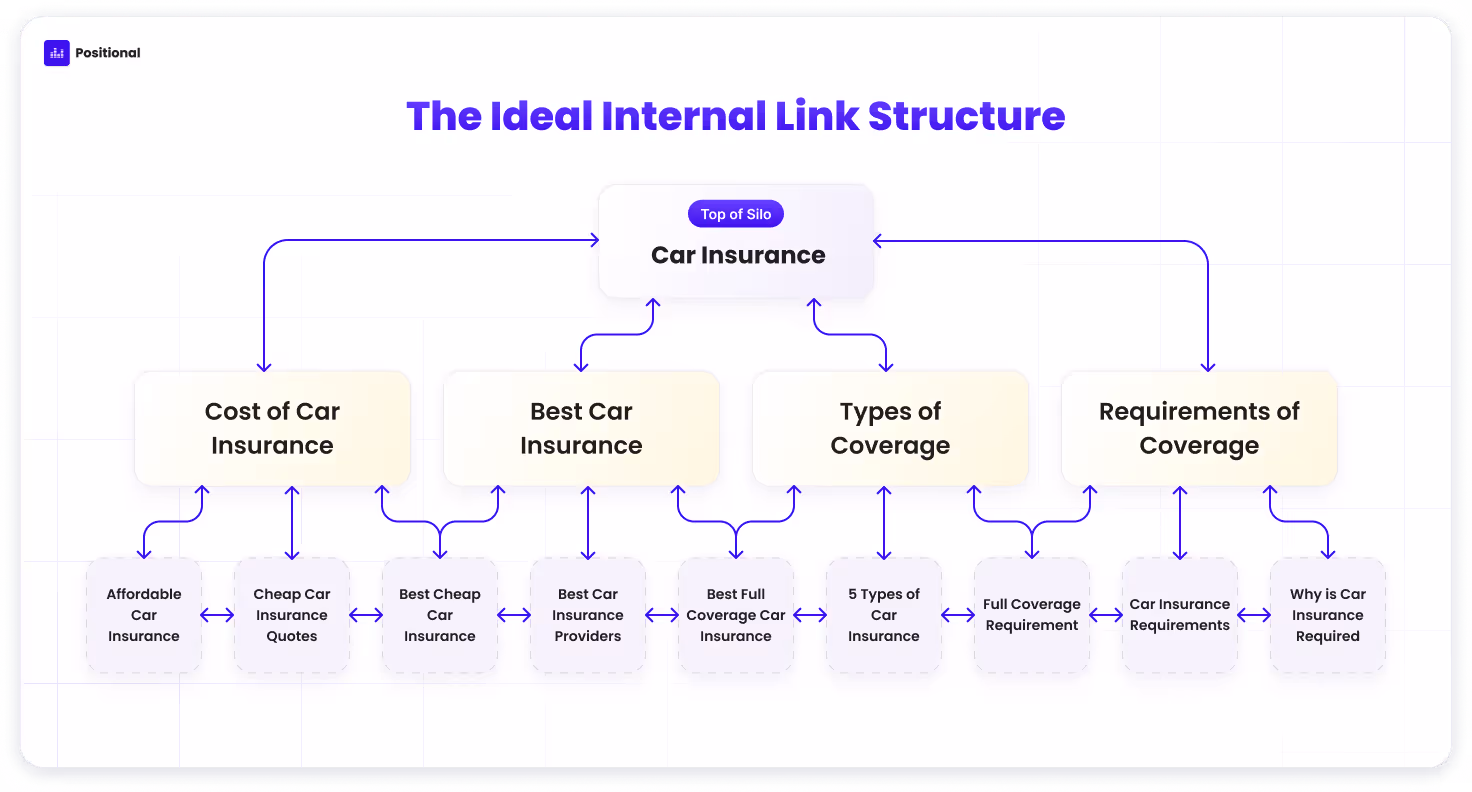
If you’ve internally linked correctly, you should be able to create a map like the one above, which clearly shows where you’re linking posts to one another and to broader topic pages above them in their silo.
This is critical to building topic relevance in your niche. For example, if I were building a website about car insurance, I would try to cover all 100-plus topics and keywords that consumers are searching for related to car insurance. This is important because it helps demonstrate to search engines that your website is a true authority on the topic. It can also be helpful in driving larger amounts of traffic and brand relevance in the category.
By including internal links from one post to the next, you’re communicating to Google what your website is about and what each page on your website is about. In the graphic above, I created a silo for a blog category about car insurance. At the top, we might have a general article about car insurance intended to rank for the broad term “car insurance,” and then from the top of the silo, we link down to other pages like “cost of car insurance,” “best car insurance,” and so on.
Internal links help you communicate to Google which pages on your website are important. Internal links also help to distribute domain and page authority across your website. You can use internal links to redirect link equity or PageRank to areas of your website you care most about.
With internal links, you’re telling Google which pages you care about and which pages are relevant for the different readers of your website.
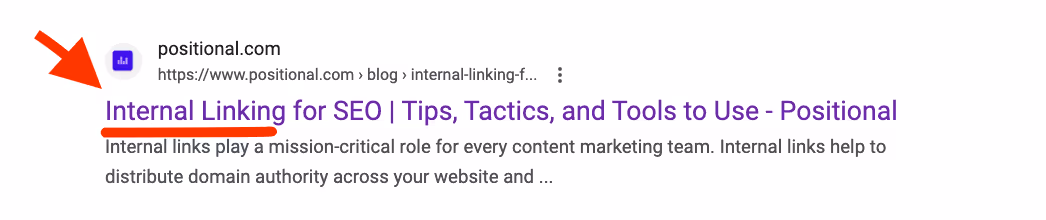
Pro Tip: Don’t forget to use relevant anchor text when you’re internally linking your content. Anchor text is the word(s) that include the link. For example, this link to Positional is anchored with “Positional.” If you’re linking internally to an article about the cost of car insurance, you should anchor these links with relevant terms like “cost of car insurance,” “car insurance costs,” or simply “costs.” Internal anchor text helps you communicate to Google what the page you’re linking to is about. You should avoid using the same anchor text over and over again; instead, you should use variants as shown above.
Implementing internal links is a very manual process. As you’re creating new website content, you’ll want to have a repository (for instance, a Google spreadsheet) of internal links that you can add to the content. You’ll also want to go back to the previously published content and add new internal links to new pieces of content that you create.
This process is very important but also very time-consuming. (Warning: sales pitch ahead) At Positional, we actually just launched Internals, a toolset for internal linking that can help you automate the process of finding and implementing internal links:
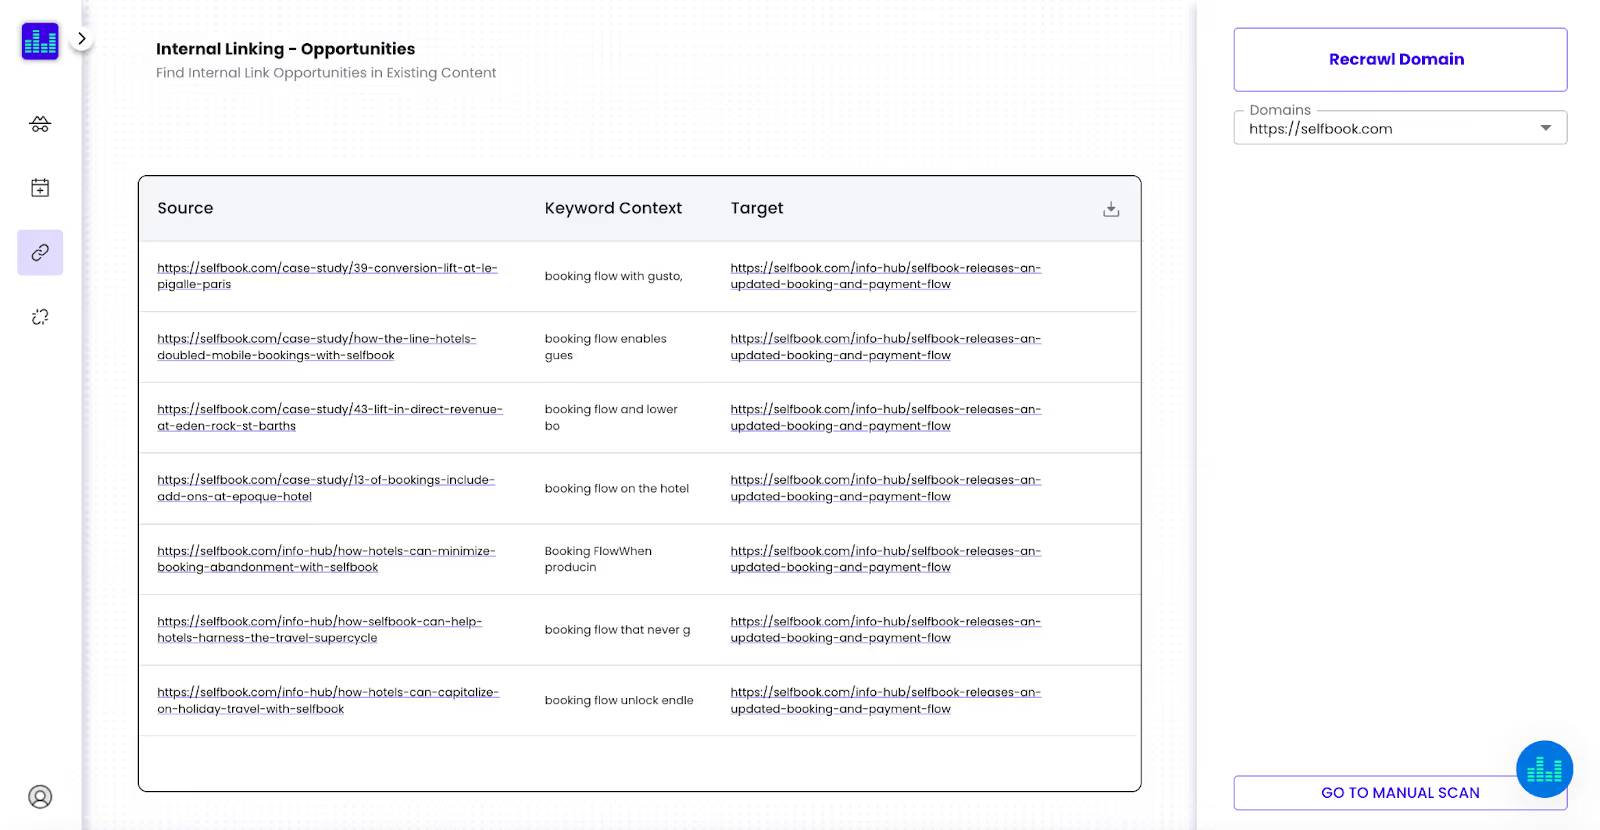
Our tool will crawl and index your website and find specific pages and areas of your website where you can add internal links to existing content. It works with new content, too! For example, if you’re about to publish a new blog post, you can copy the content into our tool, and it will show you where you can internally link to existing content on your website.
If you’d like to learn more about it, just let me know – you can grab a spot on my calendar here.
5. Write Clear Headers: H1s, H2s, and H3s
Headers are helpful for both search engines and your readers. H1s are typically headlines, H2s are typically subheads or subtitles for the meaty sections of an article, and H3s and H4s are for the finer points within your H2s.
Before you publish your content, you should take a few minutes to make sure that the headers in your content match the keywords you’d like the article to rank for.
For example, if you are writing an article about the cost of car insurance, you should use that keyword in your H1. For this article, I would suggest using a header like “Cost of Car Insurance | Costs by Location and Coverage.”
In your article, you should use your H2s and H3s as a way to give Google more information on what your article is about. For example, if you’d like your post to also rank for keywords related to low-cost car insurance, you’ll want to include an H2 or H3 that mentions the other related long-tail keywords you’d like to rank for. In this example, I would include a section in my article and a corresponding H2 that mentions “low cost” specifically, like “Low Cost Options | What Makes Car Insurance Cost Less.”
Here’s an example:
- H1: Costs of Car Insurance | Costs by Location and Coverage
- H2: Low-Cost Options | What Makes Car Insurance Cost Less
- H3: Increasing Your Deductible Lowers Costs
- H2: Comparing Car Insurance Costs
- H3: Geico Costs
- H3: Progressive Costs
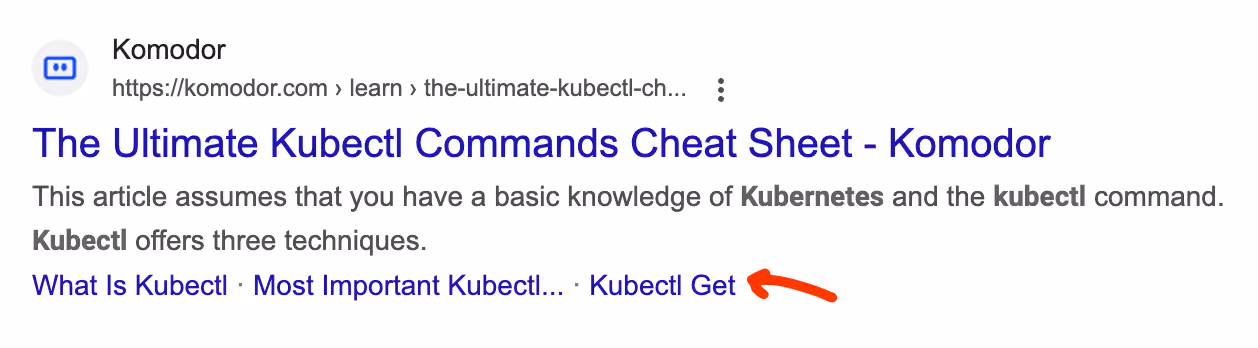
Pro Tip: I always recommend including a table of contents with dropdowns to your headers in your blog posts. Tables of contents are great for improving engagement rate, time on page, scroll depth, and other user experience–related data points that Google uses to decide whether a page is a good one. In addition, tables of contents create deep linking opportunities, and Google may include your table of contents items in your search listing directly:
6. Use Clear, Short Publishing URLs
Google has said mixed things about the importance of URLs, but my general advice is to align the URL of the post to the keyword you’d like to rank for. Permalinks have historically been important for communicating to Google what a webpage is about.
Before publishing your blog post, you should take a minute to double-check the publishing URL, or permalink. CMS platforms will often generate a URL based on the headline in the article, but I think it’s a good idea to edit the URLs for clarity and length.
For example, for an article with the title “Cost of Car Insurance | Costs by Location and Coverage,” by default, a CMS like Webflow will generate a URL like this: yourdomain.com/blog/cost-of-car-insurance-costs-by-location-and-coverage.
Instead, I’d recommend cutting down the URL to the primary keyword in focus: yourdomain.com/blog/cost-of-car-insurance.
Keep your publishing URLs on the shorter side and focused on the specific keyword you’d like to rank for. Remove any extra words that aren’t critical, like “the,” “a,” and “and.”
7. Optimize Title Tags
Title tags are included in the <head> section of your webpage using the <title> HTML element. Title tags are a confirmed ranking factor, and Google uses them to determine what your page is about and what title to show for your page in organic search results.
Most CMS platforms will include a title tag by default, typically copying in your H1 as the title tag. However, you are able to use a different H1 and title tag for a webpage. Your title tags should be used to entice a searcher to click on your result. Title tags can have a meaningful impact on CTR, thus impacting traffic. In addition, by improving your title tags and CTR for your webpage, you will improve search rankings for that page. Don't forget to keep your title tags short. Title tags should be 50-60 characters, not exceeding 65 characters, otherwise, they will likely be cutoff in search.
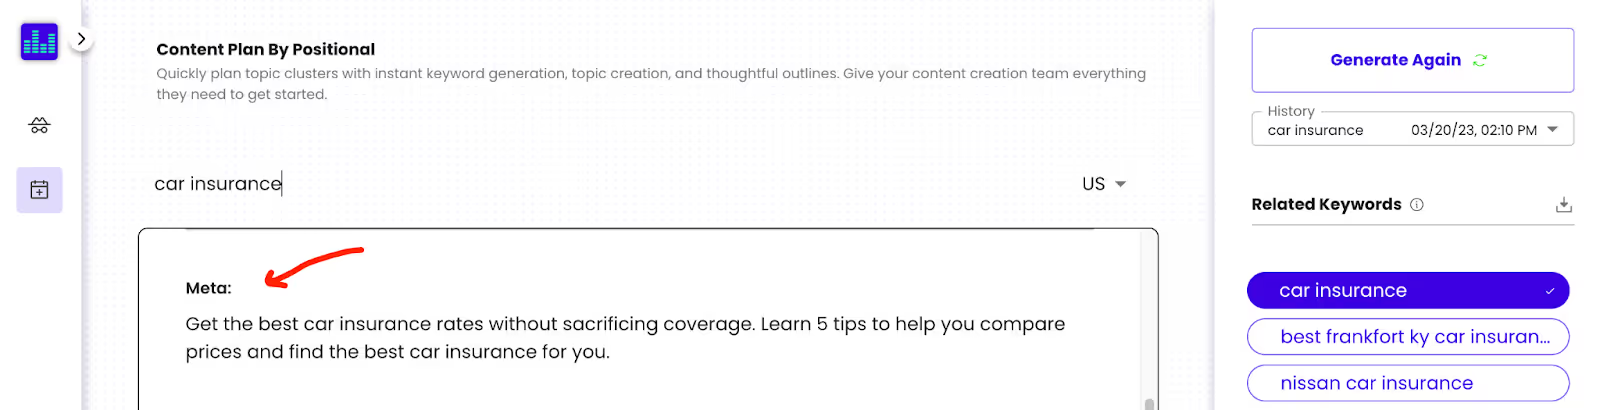
8. Include Meta Descriptions
Don’t forget to include meta descriptions before posting your content!

According to Google, a meta description tag (like the one above) informs and interests users with a short, relevant summary of what a particular page is about. It’s like a pitch that convinces the user that the page is exactly what they're looking for.
While Google suggests that there isn’t a limit on how long your meta description should be, I recommend that you keep your meta descriptions at 140 to 160 characters. If your meta description is too long, it will be cut off by Google on the search results page.
(Warning: sales pitch ahead) At Positional, you can use our Content Planner to automatically generate meta descriptions:
9. Use a Structured Data / Schema
Structured data, or a schema, is another way for you to communicate with Google. And importantly, it is a way for you to increase CTR and engagement with your search listings in Google.
Have you ever Googled a recipe term, like “best chocolate chip cookies,” and seen a result like the one below?
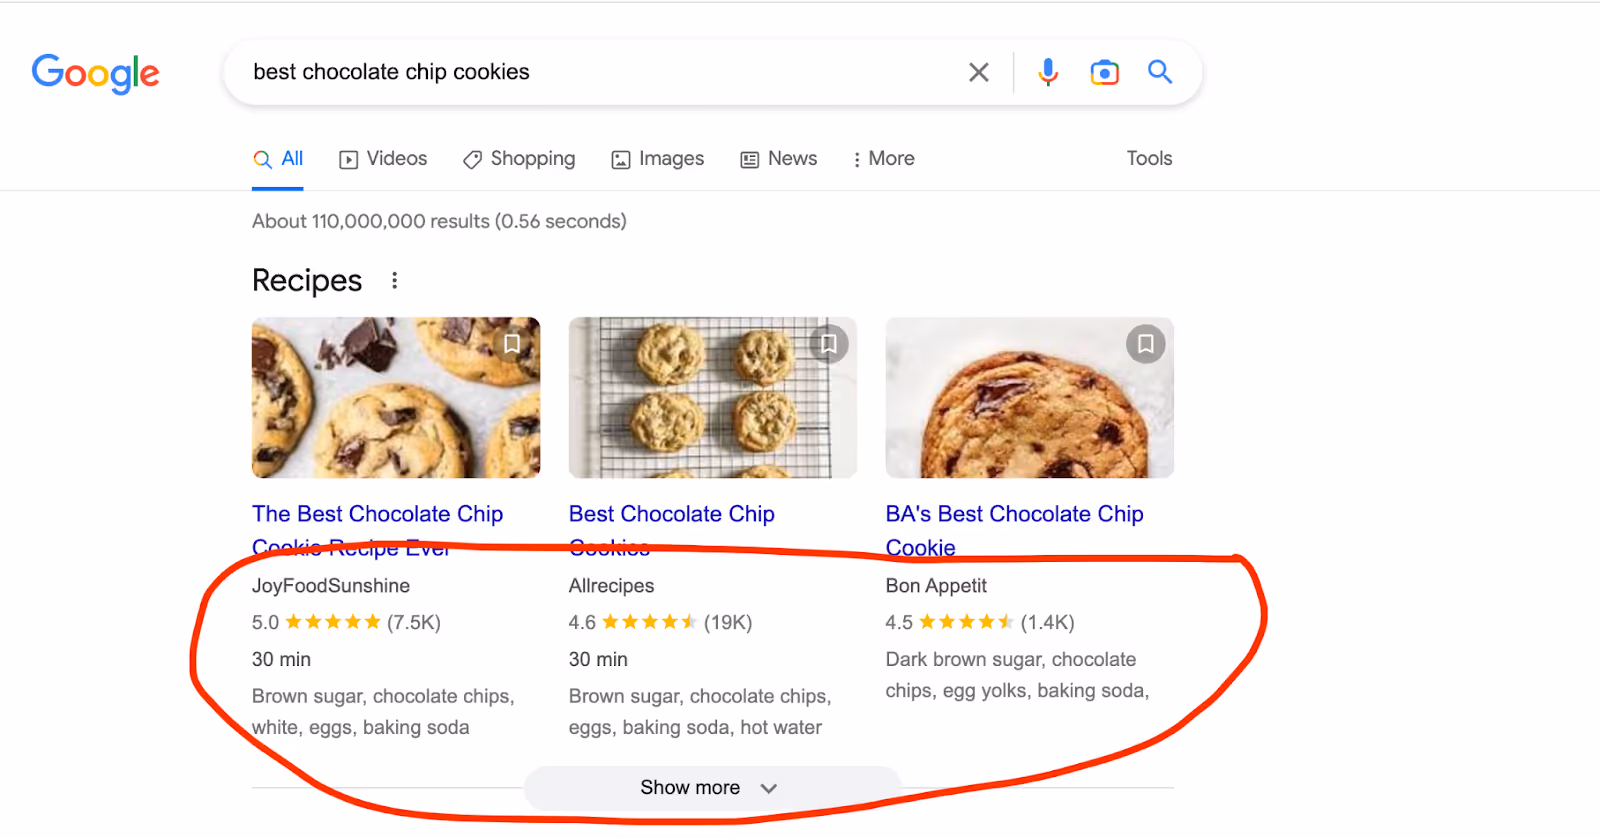
In this example, JoyFoodSunshine, Allrecipes, and Bon Appetit are using structured data to tell Google more information about their articles. In the example, we see data like reviews, cooking time, and ingredients. All of this data is being communicated to Google via structured data, or schemas, and Google is using it to improve the quality of their search results.
In the past, I’ve had a lot of success adding FAQ structured data and author schema to my blog posts. For example, by adding a FAQ schema, you can increase the footprint of your search listing. Here is an example:

In short, you can use structured data, or a schema, to take up more real estate on the search results page. And by adding this data, you’ll encourage searchers to click on your search result — thus improving traffic to your website and indirectly improving your search rankings.
Google has published extensive guidelines for implementing structured data on your website. If you need help implementing structured data, give me a shout and I’d be happy to help.
10. Improve Website Speed & Core Web Vitals
Website speed and page load time are critically important to ranking well in Google’s search engine. Google prioritizes pages that load quickly for users on both desktop and mobile.
Whether you’re self-hosting your website or using a hosted service directly from a CMS like Webflow, you should make sure that things are loading quickly for readers.
I advise against using very cheap hosting plans or platforms. For example, don’t use website hosting that costs $6 per month on a shared hosting platform like GoDaddy.
Google Search Console provides a toolset called Core Web Vitals (CWV). Google introduced CWV to help teams measure metrics that are critical to user experience and performance. Google provides three core vitals for both desktop and mobile: Largest Contentful Paint (LCP), First Input Delay (FID), and Cumulative Layout Shift (CLS):
- Largest Contentful Paint (LCP) measures loading performance. To provide a good user experience, LCP should occur within 2.5 seconds of when a page starts loading.
- First Input Delay (FID) measures interactivity. To provide a good user experience, pages should have a FID of 100 milliseconds or less.
- Cumulative Layout Shift (CLS) measures visual stability. To provide a good user experience, pages should maintain a CLS of 0.1 or less.
Google provides reporting so you can see whether there are any issues with your pages:
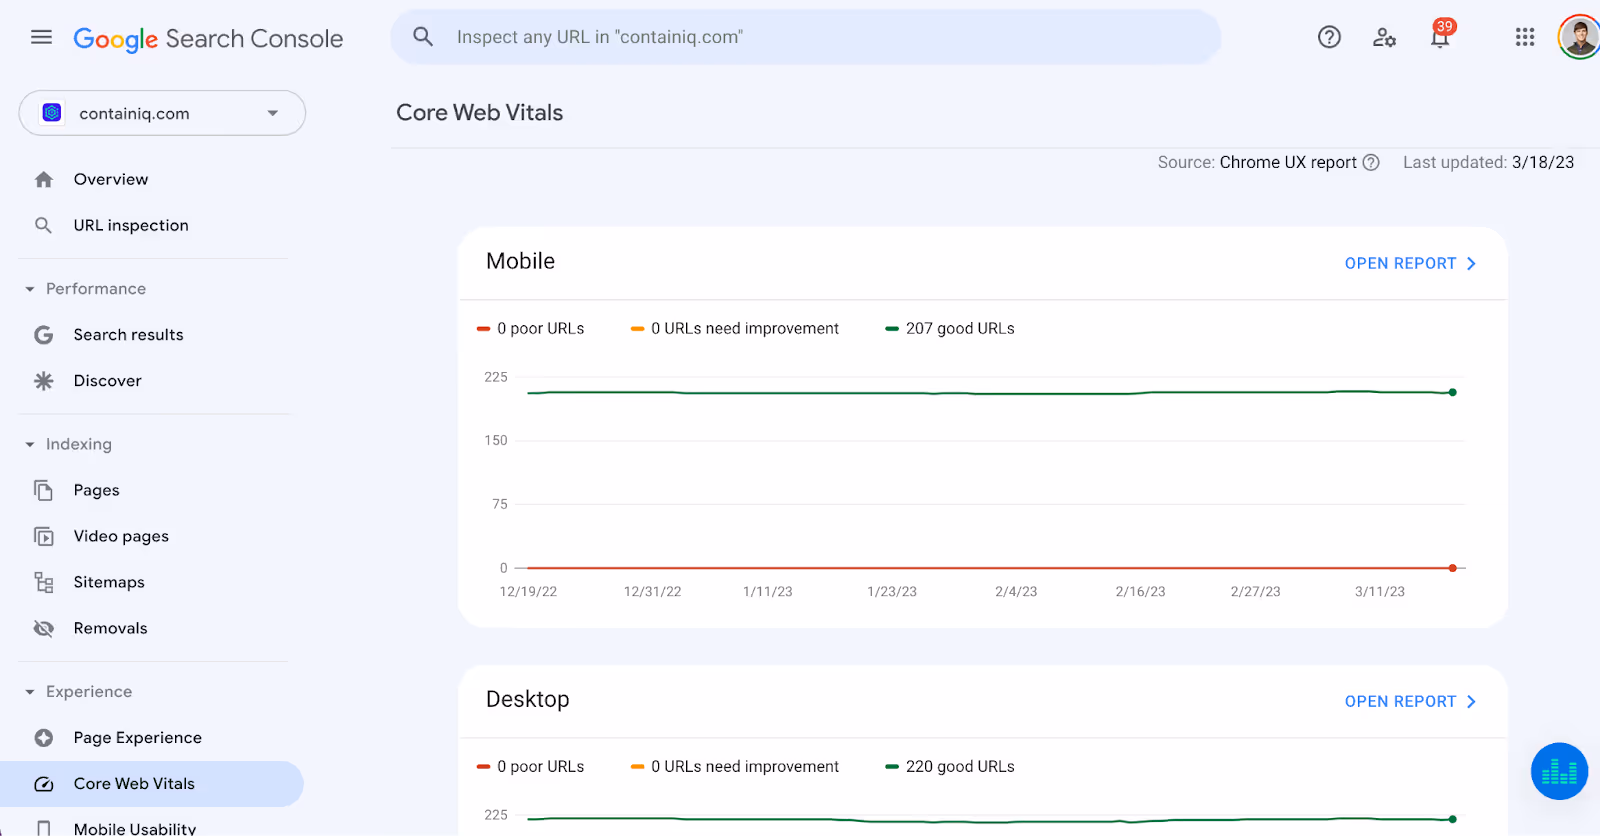
In our case, there aren’t any issues with Core Web Vitals, but you can zoom in on specific pages if you’d like:

For example, for the page above, we see that this URL has an LPC of 2.1 seconds, a CLS of 0.03, and an FID of 13 milliseconds.
After you set up Search Console, Google will automatically notify you of CWV issues that arise at the page level.
Pro Tip: Improving initial load times is an easy win. You can do this by lazy loading your images not in the first visible viewport, deferring scripts where possible, and ensuring that rendering isn't blocked unnecessarily.
11. Ensure Mobile Usability
Google is increasingly optimizing search for mobile usability and performance. In Google Search Console, you can check for mobile usability issues directly:
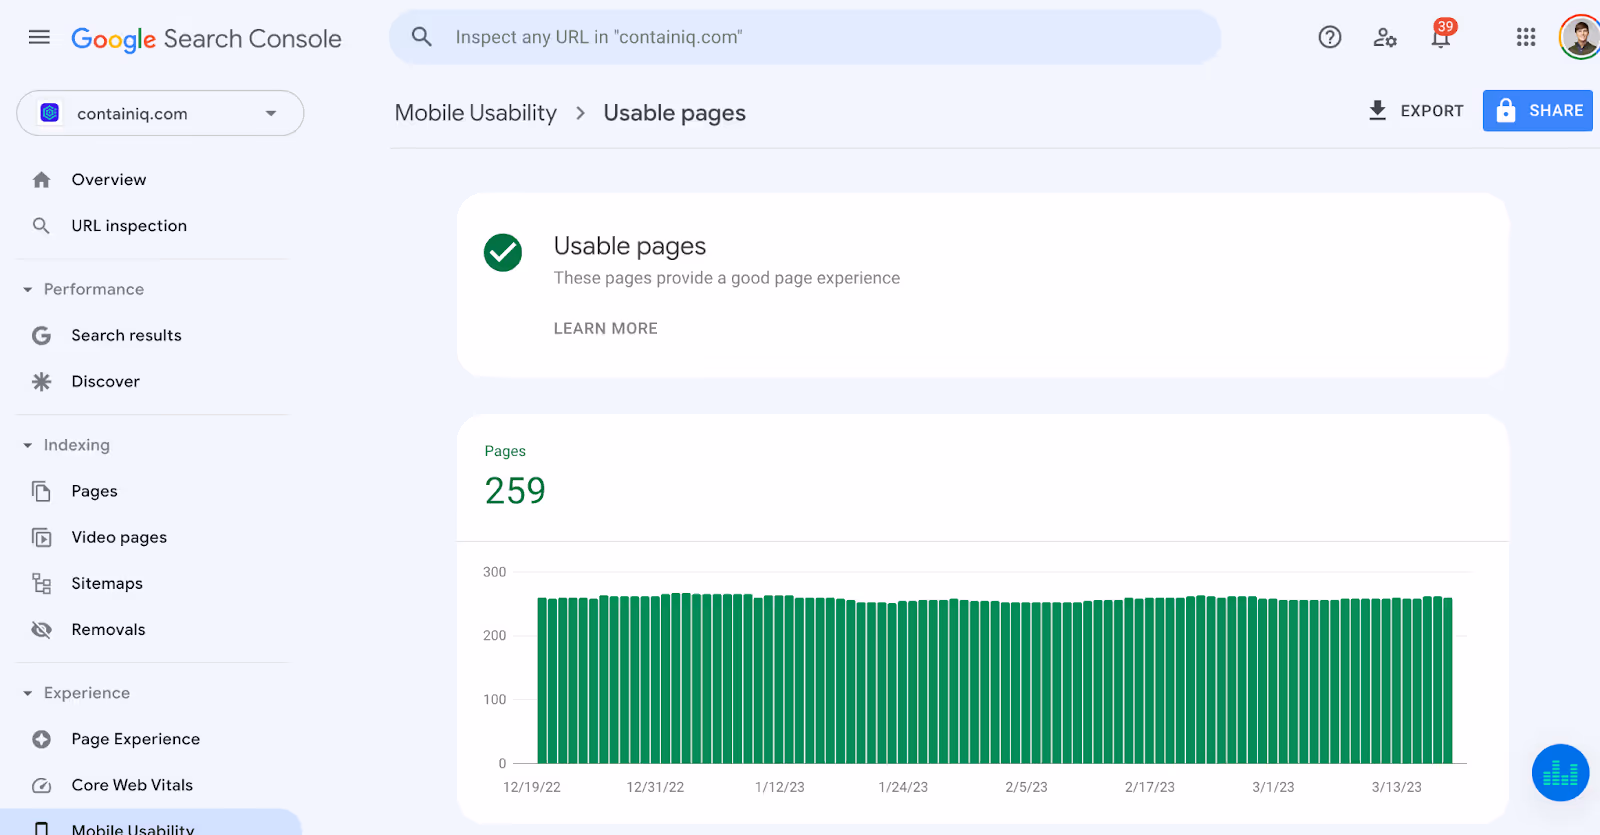
For each of the URLs on your website, Google will test your page to make sure that it’s mobile-friendly. For pages with a large number of graphics or other elements, like tables, double-checking that everything comes through clearly on mobile is important. In our case, there aren’t any mobile usability issues to dig into.
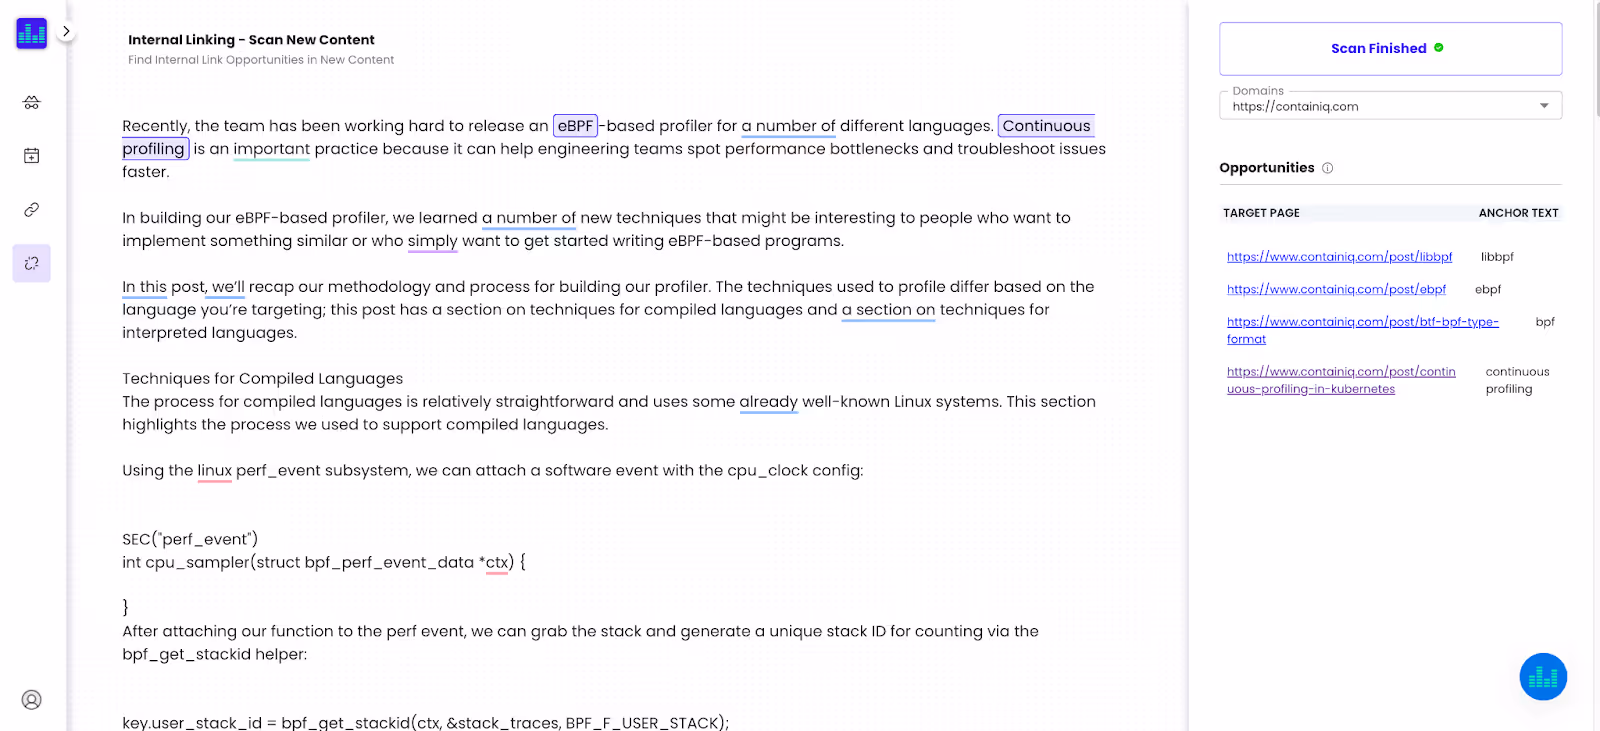
12. Check Indexing
A common question I get from founders: why aren’t all of my pages indexing?
Google Search Console provides a page-indexing tool that shows you which pages of your website are indexed, which pages on your website aren’t indexed, and why.
If you’ve recently published a large number of new pages (for instance, landing pages for specific geos), you’re going to want to double-check to make sure that everything is indexing properly:

In our case, we see that Google is reporting that 142 pages aren’t indexed, and they provide a reason for each. In the screenshot above, we see that many of these pages aren’t indexing because they are being redirected or because we’re using a canonical tag, which is totally fine.
But some of these pages are worth investigating: for example, the 23 pages that are currently 404-ing and the two pages that are crawled but not indexing.
In our case, we should 301 redirect the old 404-ing URLs to a new source.
If you see that a large number of your pages are being crawled but not being indexed (though they should be), you should investigate further.
The number-one reason that I see a large number of pages not being indexed is thin, duplicate, or low-quality content issues. Content quality is a very important factor when it comes to ranking well in Google search results. If Google is telling you directly that it doesn’t want to index one of your pages, you should put together a plan for figuring out why and how to fix the issues. More on thin content below! You can also give me a shout, and I’d be happy to take a look.
13. Avoid Thin or Duplicate Content | Programmatic SEO
As I mentioned previously, thin or duplicate content is the number-one reason that I see content failing to index in Google search results.
What is thin content? Thin content typically refers to posts or pages on your website that don’t have a lot of content or unique text. Thin content issues usually happen as a result of:
- Programmatically creating a large number of very similar pages.
- Your team creating a large number of unhelpful or low-quality articles.
For example, if you were operating a website about car insurance, you might have a large number of geographical pages: for example, “Cost of Car Insurance | Houston Texas.”
You might be programmatically creating these pages, but you might also just be churning them out very quickly without a whole lot of changes from one post to another.
If Google sees a large number of programmatically created pages or posts, it might not view these pages as uniquely valuable and may not index them as a result.
When creating new content programmatically, I would try to include at least a few hundred words of original text for each of the posts. In the example above, if I were programmatically creating content for Houston, Texas, I might try to include a few hundred words of original text about the Houston market alongside whatever is being generated automatically.
Programmatic SEO is a fine strategy, and it can be scaled, but it’s worth investing some time to make these pages unique and to double-check that they’re being indexed correctly.
Thin content issues also arise when the quality of content you’re publishing is just very low. I’ve talked to a handful of companies who have published 50 to 100 articles, with just a couple hundred words on each post. And I’ve also talked to a number of companies who have copied and pasted a large amount of content from other websites.
When you’re creating content, you should aim to include at least 500 to 700 words of original content on the page (we create 1,200- to 1,500-word posts). And you should avoid copying and pasting content from other websites into your posts. At Positional, we have a plagiarism-detection toolset that you can use to make sure that you aren’t plagiarizing other sources.
14. Use Canonical Tags If You Are Republishing
Republishing content from your website to other distribution channels can be a great strategy. For example, you might want to copy and paste your article onto a platform like Medium.
If you’re distributing your content onto other channels or websites, make sure that the republished content includes a canonical tag. A canonical tag (or "rel canonical") is a way of telling search engines that a specific URL represents the master copy of a page.
In other words, the canonical tag is a piece of code that you include within your article, and it lets search engines know what the original source of the content is.

Source: Moz
For example, if you republish your article to another website, you will want to make sure that the website you are posting to includes a canonical link back to your original posting URL.
Otherwise, search engines might not know which page was the original source for the topic, and as a result, they won’t know which page to rank in Google search results. The last thing you want is for the website where you republished your content to rank higher than your primary domain.
15. Using hreflang Tags for Multiple Languages
hreflang tags are a very technical solution for websites with similar content in multiple languages. If you’re targeting multiple locations with multiple languages, you’ll want to use hreflang tags.
For example, if your user is in Colombia, and your pages rank in English, but there are also Spanish versions, you want to tell Google to show the Spanish pages in the search results for the Colombian user.
hreflang tags can be used to mark up your pages aimed at different languages and geos. There are three common ways to implement hreflang:
- Content with regional variations like en-us and en-gb.
- Content in different languages like en, de, and fr.
- A combination of different languages and regional variations.
hreflang tags allow you to optimize your page for your specific user, and help you avoid the problem of duplicate content. Without the hreflang tag, Google may be confused as to why you have multiple but slightly different instances of the same page.
Implementing hreflang tags can be done in three different ways:
- Using link elements in the <head>.
- Using HTTP headers>
- Using an XML sitemap.
This fantastic article from Yoast goes in-depth about how to implement each of these solutions.
Final Thoughts on Technical SEO
I hope that this post was helpful. There’s a lot more that could be covered here, and I’ll plan on updating this post in the future with additional sections.
If you’d like help with any of the topics covered in this article, please let me know. At Positional, we’re building a toolset for content marketing teams. And as I mentioned in this article, we just launched a new toolset for internal linking, which is really helpful for finding missing internal link opportunities in existing and new content.
Happy to have a quick chat if you’d like to talk about any of these topics or if you’re interested in learning more about Positional. My calendly is here.